 An affordable alternative to a tabletop printing press: a cold mount laminator! One of the limitations to printmaking in a home studio is the high cost of a printing press. There are quite a few options for printing by hand, from Japanese style barens to rolling pins to spoons! Those all work well in certain situations, and for acetone transfers they’re essential, a press just won’t work. But for many monotypes and collagraphs, a press can really speed up the process...if you can afford one! About a year ago I came across a device called a cold mount laminator (there are electric hot laminators too), designed to adhere photographic prints or other artwork to backing boards of various types. I wanted to try it for adhering sanded pastel paper to foam core before starting a painting, since it’s really tricky to mount a finished pastel to a backing board during framing, without being able to touch the surface or flip the painting over. I found a company in Washington State called Pacific Mount, which specializes in this kind of mounting and sells all the products you need: adhesives, boards of all sizes, and laminating machines. When I saw their 25” laminator, it struck me that it was extremely similar in form to a printing press for etching or intaglio: two opposing drums with a crank that rolls your plate and paper between them. It has two knobs to adjust the pressure, and enough space for a flat bed to support the work, plus some cushioning material. The company was great about answering my questions (“Um, no, we haven’t heard of anyone using it this way, but give it a try!”), and the laminator is very affordable—especially compared to a “real” press which can run thousands of dollars. So I was excited to give it a spin. And it worked! Really well!  Pacific Mount's 25" cold mount laminator. The body of the laminator is metal, so it’s fairly heavy. The bed folds up for storage or transport, and I use a very small bungee to hold it closed when not in use. The drums are rubber, and while the pressure knobs are plastic, the rest of the threaded pressure adjustment is metal, and the whole thing feels robust. Monotype doesn’t require the same level of pressure that intaglio does, since you’re not trying to push dampened paper into incised areas of the plate. All the texture that you create is on the surface of the plate, and can only be printed once or maybe twice (the ghost print) before the ink is used up. So I’ve found the pressure of the rubber drums to be quite adequate. I’ve fastened the laminator down to a piece of birch-faced plywood, which can in turn be clamped onto my work table so it doesn’t slide during a print. And I do think that a larger diameter crank handle would be easier to use, and allow me to crank with one hand while guiding my paper through the bed with the other, so I’m looking for a way to modify or replace the handle. A “real” press has a heavy metal bed that rolls back and forth between the drums to support a plate and paper, and several specialized felt blankets to cushion the work and spread the pressure evenly. I’ve had good results using a piece of 3/16” foam core as a bed, and I’ve also used a sheet of plexiglas and masonite—all are fine. The traditional combination of blankets is a thin sizing catcher next to the paper, a thick cushion blanket, and a thin pusher blanket on top. These blankets can add up to a thickness of 3/4 inch, which is the largest space that the laminator can have between the drums. So I’ve left out the thick cushion blanket, and use only two blankets: the catcher is a very thin pressed all-wool felt that I purchased from a specialty printmaking supply shop, and the pusher blanket is a thicker wool felt that I got at a local fabric store. (I’ll link to all the materials at the end of this article.) The important quality of the blankets is that they’re natural wool, which withstands the repeated pressure better than synthetic felt, and that the blanket that’s closest to the paper does not have a weave that could transfer texture to the paper under pressure. Back in school, I was always taught that the blankets are not washable, and any student who got ink on them would be drawn and quartered and then have to buy replacement blankets and a round of drinks for the entire art department. Now I suspect that if you got water miscible ink, like Akua, on the blankets, they could in fact be gently washed and laid flat to dry. But it’s a good idea to put a few sheets of newsprint under your plate and on top of your paper as you run it through the press, just to catch any stray ink and spare your blankets.  The sizing catcher is the thin white blanket, while the natural wool colored blanket is the cushion/pusher. There are a few things that are good to remember. First, if you’re new to printmaking, remember that the image on your plate will be reversed horizontally on your paper. That hardly matters unless you have text in your image! Second, protect the drums on your press—in this case, they’re rubber and could be damaged. If you’re trying collagraph and adding texture that stands up above the surface of your plate, for example putting an inked leaf or vine on the plate, I recommend reinforcing the blankets with a piece of foam core laid on top. The foam can deform on one side while staying smooth on the other, sparing any indentation on the upper rubber drum. Third, wipe everything down, including your hands, before you lay your paper on the plate and put your work on the press. Stray ink on the borders of your image is just disappointing. Printmaking is a very malleable process, that rewards you for experimentation and for thinking through your process before you start. Peeling the paper away from the plate is like opening presents on Christmas...anticipation, some trepidation, sometimes glee and sometimes disappointment. When it works, the texture of a print is totally unique to the medium. Some parts of the monotype process are uncontrollable, which is actually great if you’re looking for a way to loosen up your work! Prints can be run through the press multiple times with different colors, disparate methods can be combined for a single print, and prints can be overpainted with watercolor, acrylic, pastel, ink or many other mediums. If you haven’t tried it yet, I hope you’ll give it a shot! I’m by no means an expert printmaker, but if you have questions please leave them below, and I’ll try my best to answer. Pacific Mount: www.pacificmount.com/products/laminators-and-accessories They have 25” and 39” laminators! Etching blankets: www.takachpress.com/access/blankets 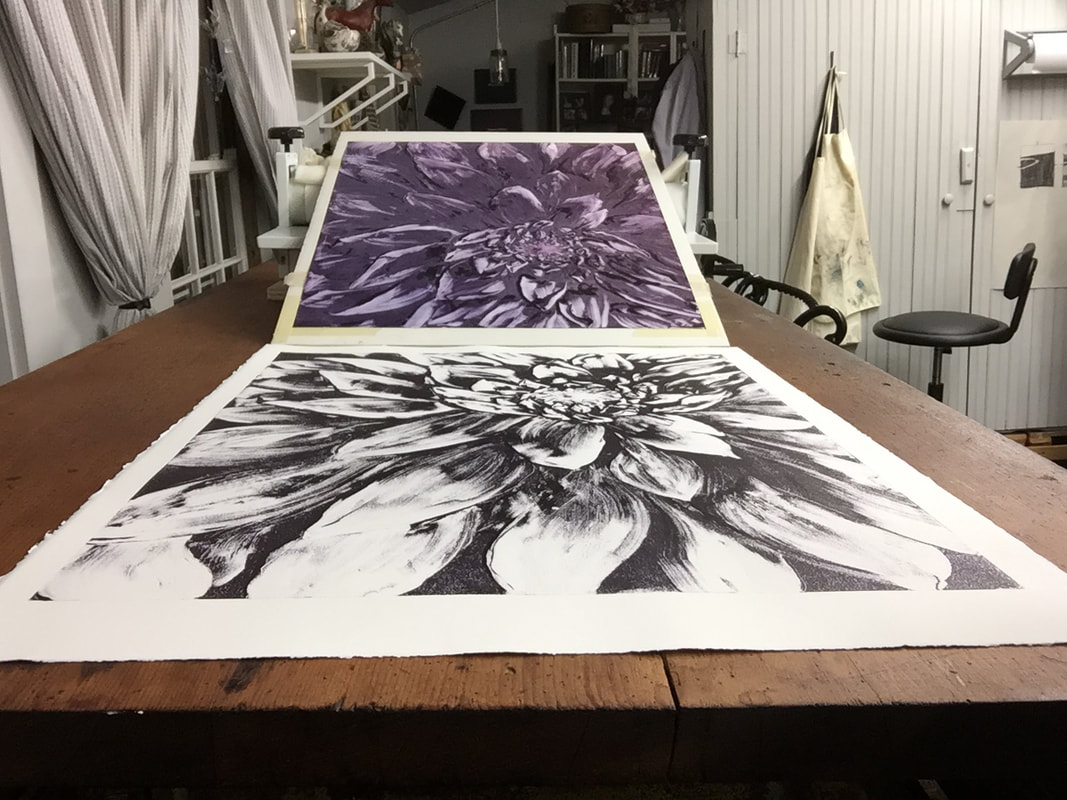 "Dahlia", monotype on Rives BFK, hot off the press! Post update: I’ve gotten many questions about how the laminator performs with various kinds of plates. I’ve tried monotypes on plexiglas, metal and Yupo paper; engravings on plexiglas and metal, collagraph plates made from mat board, found objects and TetraPak cutouts, mounted and unmounted linoleum blocks. The laminator has pulled great prints from all of them! I don’t generally make large editions, so I can’t speak to wear and tear on the drums after hundreds of prints—but I’ve had mine in frequent use for about three years now, and it’s going strong. I highly recommend trying it if you’re looking for an alternative to a hand baren! (The only process I prefer to do by hand at this point is mokuhanga. Getting the delicate patterns of wood grain to transfer with transparent ink is best done with a Japanese bamboo baren.)
24 Comments
Wendy Klein
6/3/2020 12:32:57 pm
I am planning to use this for monotype printmaking at home. I was wondering how you wen t about fastening the laminator to the birch plywood?
Alexia
6/3/2020 03:46:49 pm
Hi Wendy! I used small brass 90 degree angle brackets to fasten the laminator to its platform. This did require drilling a small hole in each side of the laminator; then I attached the bracket to the laminator first, with a bolt and nut (so it's removable). I then screwed the bracket to the plywood. All of that gave me a base so that I could use C clamps to clamp the laminator to a tabletop so it won't move. I'm sure it's not the only solution, but it's working well for me, and preserves the portability of the unit if I ever need to travel with it (I have taken it along to one workshop). 7/12/2020 11:39:11 am
First, let me say how thrilled I'm to have found your article on using a cold laminator for printing on Victoria Chan's list on ... Printhackers page on fb
Alexia Rosoff Wilber
7/16/2020 11:40:17 am
Hi Alice! I'm so glad you're enjoying printmaking with your laminator! Did you happen to see my most recent blog post, called The Bionic Laminator? I took some close up pictures of the handle modification I made to it, with captions (mouse over the pics) describing it a bit. Is your laminator the same model as mine, from Pacific Mount? If so, you may be able to do the same thing I did, if you have the tools to machine a new retaining bolt (we used a drill press). I do have a new linocut print in the works, and I hope to take some video in the coming week. I'll try to focus in on the handle in the video, and post that as well--probably on my Instagram feed because that's a really easy place to post, and it will be mirrored on FB. I'll check out the Printhackers FB page, and maybe link to it there as well since there seems to be interest. I hope that's helpful! :-)
Juarez
7/13/2022 10:27:56 pm
Do you think you can share some.photoa of the handle adaptation you made? Very interested in trying this as well. Thank you!
Michael
6/24/2020 12:18:39 pm
Hi Alexia, sorry I’m coming to this post a little late! I would like to use a cold laminator for drypoint, so it would be really helpful to know a little bit more about your experiences printing drypoint engravings. It would also be great to see your drill press handle alteration! Thanks very much. Michael
Alexia Rosoff Wilber
6/24/2020 02:29:15 pm
Hi Michael! I have used the laminator to print drypoint engravings on plexiglas plates. I use both a Dremel tool with engraving points and an old fashioned manual engraver; oddly I get deeper cuts and better burrs with the old fashioned graver than with the power tools, but the Dremel can give some lovely soft shading. I mostly use Akua soy based inks, but just bought some Cranfield inks to try, and of course need to practice more for consistency in wiping. Since I'm not trying to do big editions of matching prints, I'm pretty tolerant of my inconsistencies. But the laminator has been great for this. I use three blankets, plus some newsprint, and dampened paper, and I make sure that the edges of my plate are well beveled and sanded so I don't tear or damage anything. 12/16/2020 09:43:33 am
Do you think this could also be used for woodblock printing?
Alexia Rosoff Wilber
12/16/2020 02:40:02 pm
Hi Aaron,
Will
1/31/2021 04:09:13 pm
Hi,
Alexia Rosoff Wilber
2/1/2021 02:04:09 pm
Hi Will,
Alexia Rosoff Wilber
2/10/2021 09:32:18 am
Hi again Will, I did test out an old flat bit plate, and after some trial and error with pressure and inking managed to pull a decent print. Check out my most recent blog post for pictures and info!
Pam
8/1/2021 08:47:28 am
Thank you so much!!! I've been looking for a way to print at home since I no longer have access to the press at school since graduating. You have given me hope and inspiration!
Alexia Rosoff Wilber
8/2/2021 07:38:35 am
Hi Pam! Glad you found the information useful! I'd love to hear how it goes for you if you give the laminator a try. Good luck!
Pam
8/5/2021 05:42:23 am
I took the plunge and purchased a 14" cold laminator today. I will definitely let you know how it goes once I begin printing. Thanks again!
Bri
3/27/2023 06:11:55 pm
Hi, I love this idea! Do you know how big (size wise) this could press? And what is the biggest size you have pressed on this machine?
Alexia Rosoff Wilber
3/28/2023 10:19:15 am
Hi Bri,
Diana Kazmaier
8/5/2023 10:22:58 am
I have wanted a press, however I could not afford one. I was thrilled to read how you are using a cold mount laminator. I have ordered one and I am waiting for it to be delivered
Deborah
5/19/2023 03:37:50 am
Hi your information about the cold laminator as a press is really interesting. As I read all the comments, I am wondering what the green top roller is made of, if it is not metal is it soft and might wear out or show signs of uneven wear. I would really appreciate your thoughts on this. Thank you!
Alexia Rosoff Wilber
8/5/2023 06:45:01 pm
Hi Deborah, I’m sorry I just saw this comment. Both rollers are made of rubber over a metal core. I’ve been using mine for about 5 years now, and it shows no signs of wear. I do clean the rollers occasionally, just with water. I hope you give it a try!
Malene
1/4/2024 03:31:06 am
Hi Alexia
Alexia Rosoff Wilber
1/4/2024 08:18:07 am
Hello Malene,
Malene
1/4/2024 12:01:49 pm
Thank you very much, Alexia. I actually have a large sheet of grid paper and will try to get it laminated and fix it to a plexi plate with either an adhesive sheet or spray adhesive :-)
Marta
1/11/2024 08:14:23 am
Hello, Leave a Reply. |
Alexia Rosoff Wilber
News and notes about art. Archives
July 2020
Categories
All
|
 RSS Feed
