|
Bear with me while I test an embed code here. This is a video tour of a recent international juried pastel show by the Central Mass Pastel Society, recorded and produced by Harvard Cable TV and reposted with permission. I am having difficulty posting it to the CMPS website, so I'm testing it here.
0 Comments
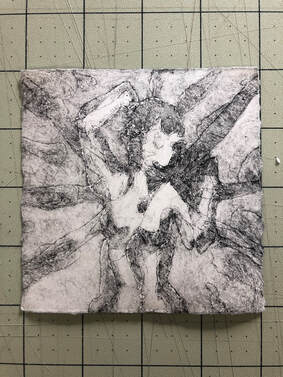
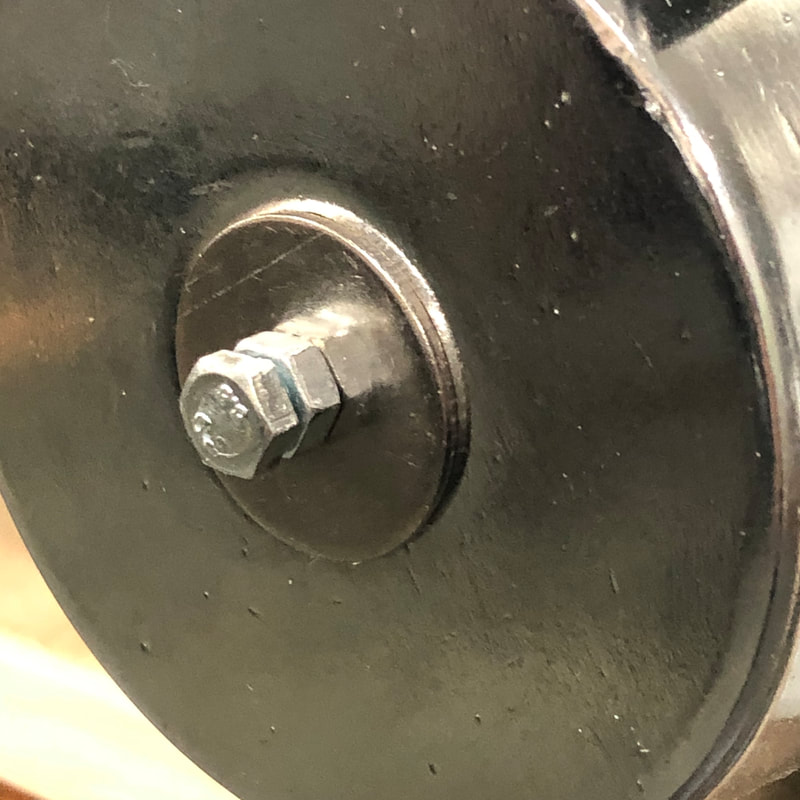
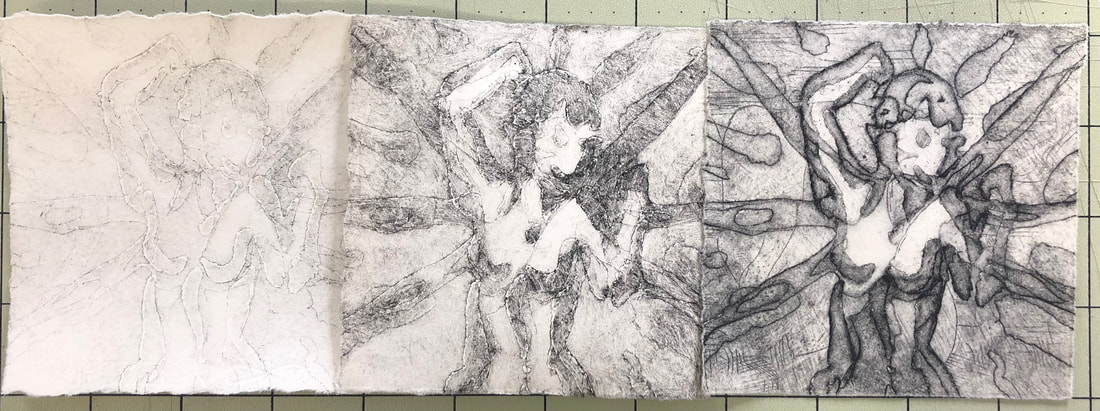 So not really etching, exactly...but experimenting with printing an old etched plate with my cold mount laminator. I've gotten a bunch of questions recently about my laminator masquerading as a printing press. With lockdowns continuing and many studios and printing co-ops being closed, printmakers are doing a lot of work at home, and I guess a lot of folks are getting tired of printing by hand with a wooden spoon and looking for something better (though not thousands of dollars better). So I've been asked if the laminator can handle relief printing? Yep. I've used lino blocks mounted on mat board and MDF, with a max thickness of nearly an inch, with good results. Can it handle engraving? Sure, I've pulled decent drypoint engravings on plexiglas. Can it do collagraphs? Absolutely! Mat board, cardboard, encaustic, TetraPak, even bark and vines glued onto mat board have worked fine. Great for embossing. I've run feathers, even old rusty washers that I found out in my farm pastures. Monotypes? Oh, my favorite! Ink up some Yupo and do a dark field monotype, lay on some lightly dampened Rives BFK, and watch the magic. Then I was asked if the press could handle etching. Er.... Honestly the last time I etched anything was in college, about a quarter century ago. I wasn't great at it. I wasn't systematic about timing, failed to plan each etch carefully, and somehow thought I could get away with printing a plate once or twice and having it turn out great. Nope. As a college student I didn't appreciate trial and error. I never pulled a large enough edition of anything to realize that the best prints would show up somewhere in the middle, after the ink got to just the right consistency and I figured out the plate's eccentricities, but before anything started to wear down. I didn't have the patience for a close examination of each print and the troubleshooting that it takes to make the next one better. I didn't keep notes. (Also--if you procrastinate and think you're going to get a week's worth of printing done the night before it's due, you're in for a long night.) So when I got this question I had to answer "I think so, but I can't be sure because I haven't tried it". I guess I could have left it there, but then I remembered that I had actually saved one or two of those old plates from college, and if I could figure out where in blazes they were I could actually test them out! 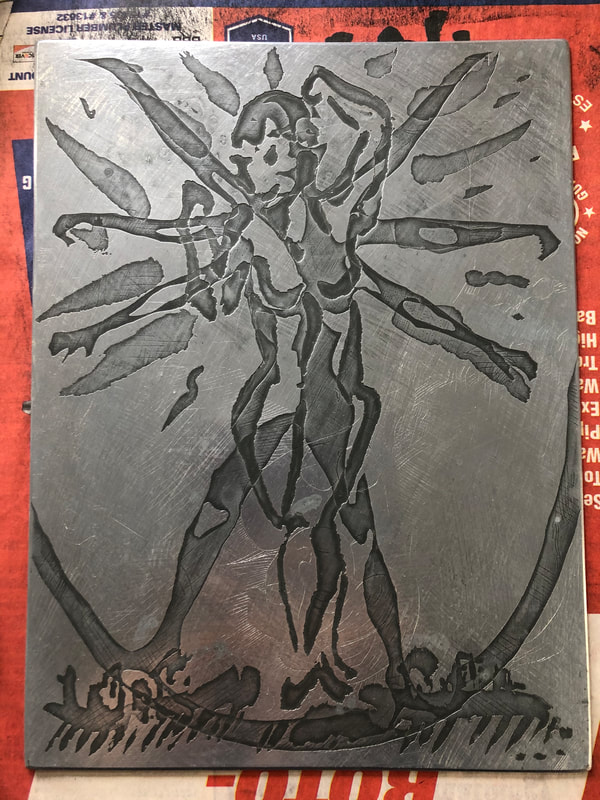 Zinc plate with flat bite, actually with the remains of an engraved image under it--I must have reused the plate a few times. This is a weird old plate. I must have been given an assignment to etch the plate in multiple overlapping layers, and I can't figure out if my inspiration for it was Rosie the Riveter, Da Vinci's Vitruvian Man, or the title sequence to Walker, Texas Ranger episodes. Is that a little tiny town under the figure's feet? Is she Godzilla? How sleep deprived was I in college? Anyway I cleaned it up from some corrosion it had gotten over the years, and set about printing.
So, is etching my new fave? Nope. It is a lot of work. I'm not wild about the chemicals and the specialized equipment I'd need, and I haven't the first notion of how to start with less toxic alternatives. But I do feel like now I can say that the laminator can do a decent job with an etched plate. If you have the skill and the patience, and you want to give it a go, I can recommend trying it with this equipment! If you have any tips for etching at home, please feel free to leave a comment below, I'm eager to hear them!  I think the faults in my etching lie in the human, not the machine.
Once again I am incredibly lucky to be able to work with the talented and dedicated educators at EdGE (Educational Gaming Environments) at TERC! They bring me the absolute coolest video projects...this time around I got to play with imagery from their new immersive VR mystery game Mission to Europa Prime! I love creating cinema style trailers, and the mood of this one was right up my alley. I can't wait to play this game!
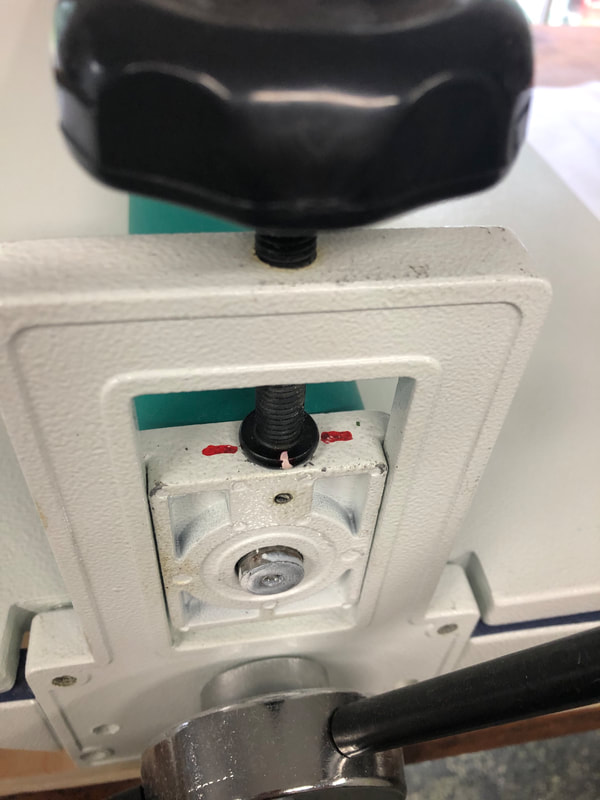
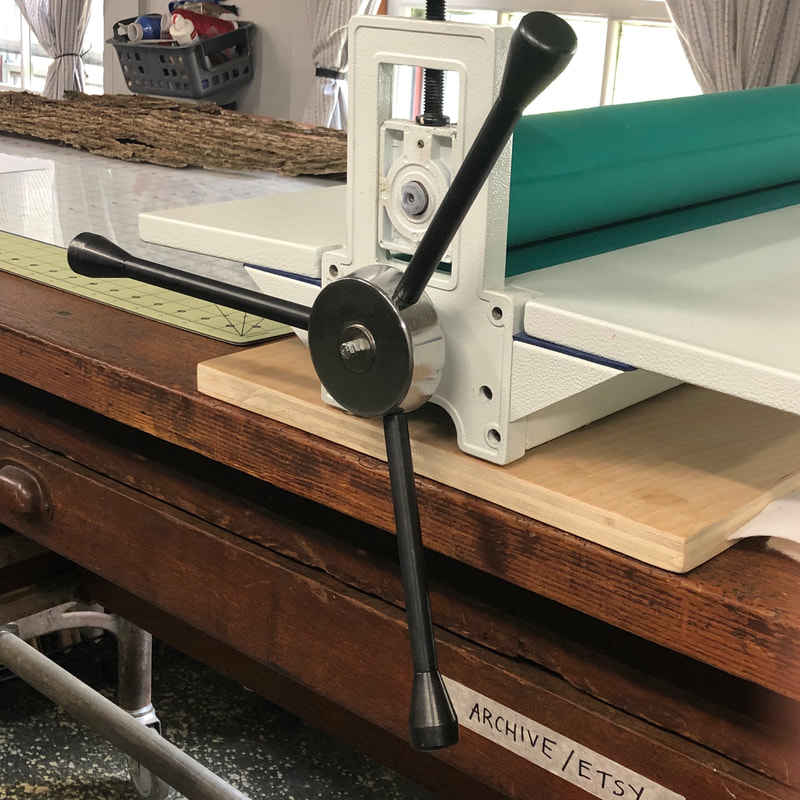
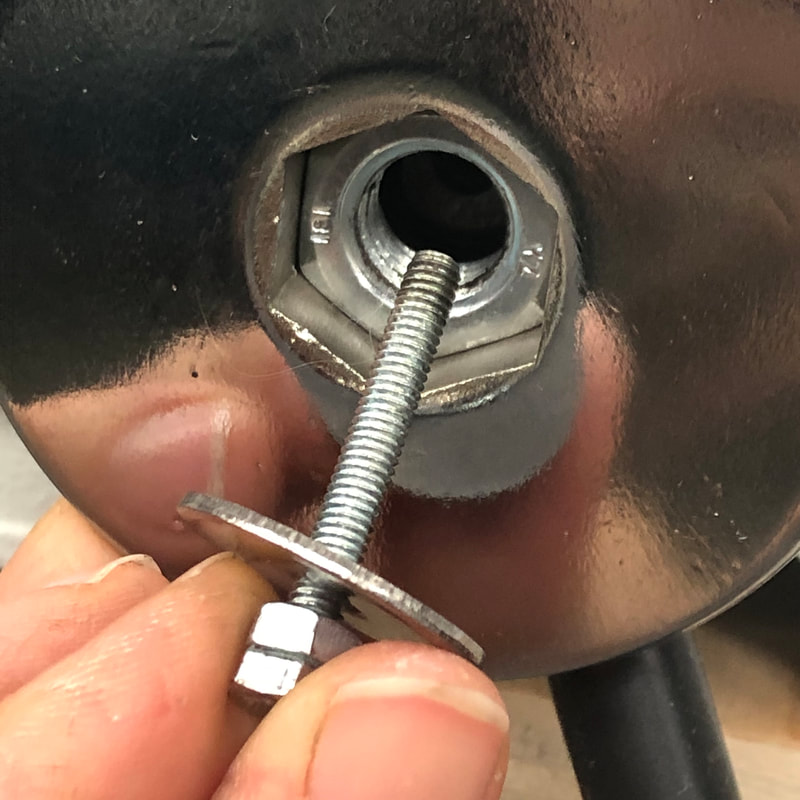
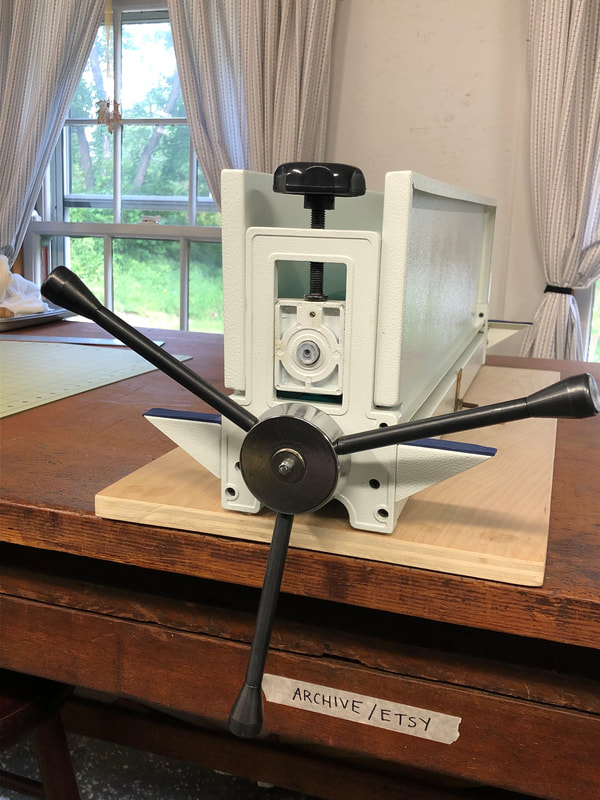
For the moment, the game is a demo prototype, and the educators and developers are working on making it a great experience for diverse learners. The station on Europa Prime is set up to be expandable, so EdGE has lots of room to innovate and invent! The puzzles are awesome and the environment is beautiful thanks to the collaboration of MXTreality. Check out the trailer, and for more info about this and other EdGE games, see their website: https://edge.terc.edu/display/EDGE/Games . Thanks again, guys! It's always a pleasure to work with you! I've had some great questions about my cold press laminator and the modifications I've made to it to gear it up for printmaking. I've fastened it to a wooden platform that I can clamp to the table so it won't move when there's a lot of pressure while cranking; I've added basic registration marks to the pressure knobs so I can more accurately keep the pressure even across the drums; and I've changed out the original crank handle for a drill press handle, which is much easier to turn and keeps the bed moving more smoothly through the drums. Here are some pictures of my modifications: I'll see if I can get some time to print soon, and take some video so you can see how it all works!
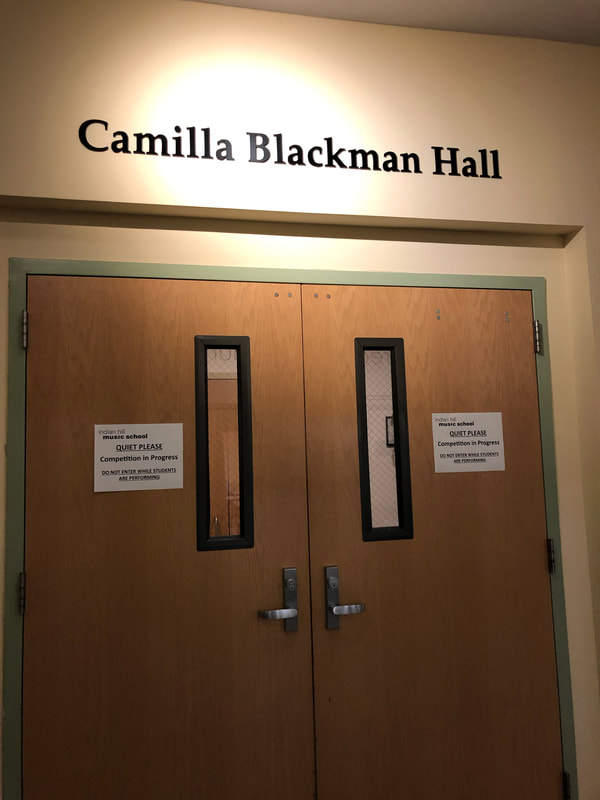
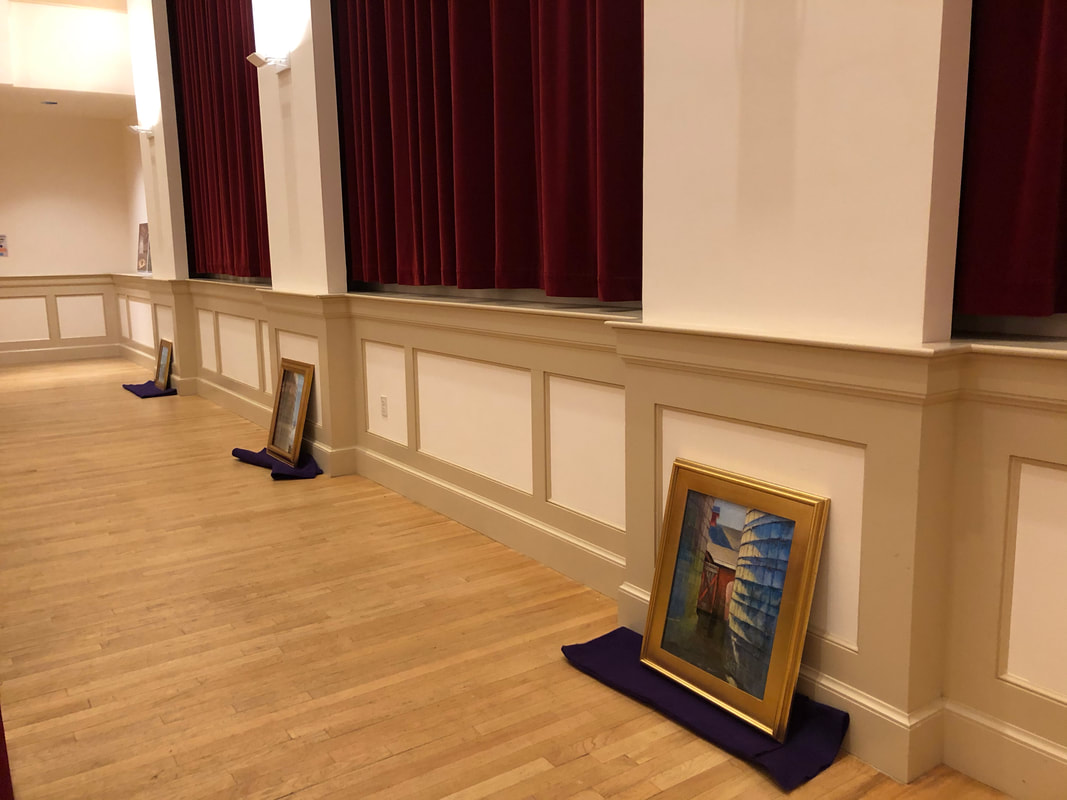
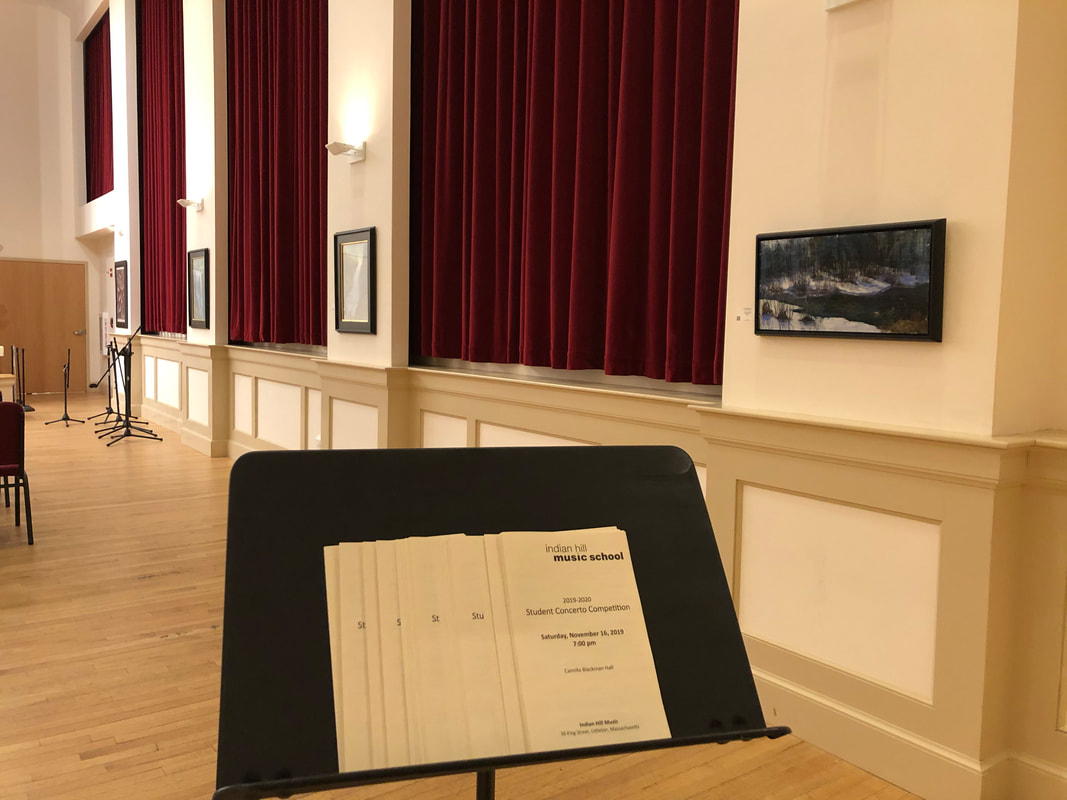
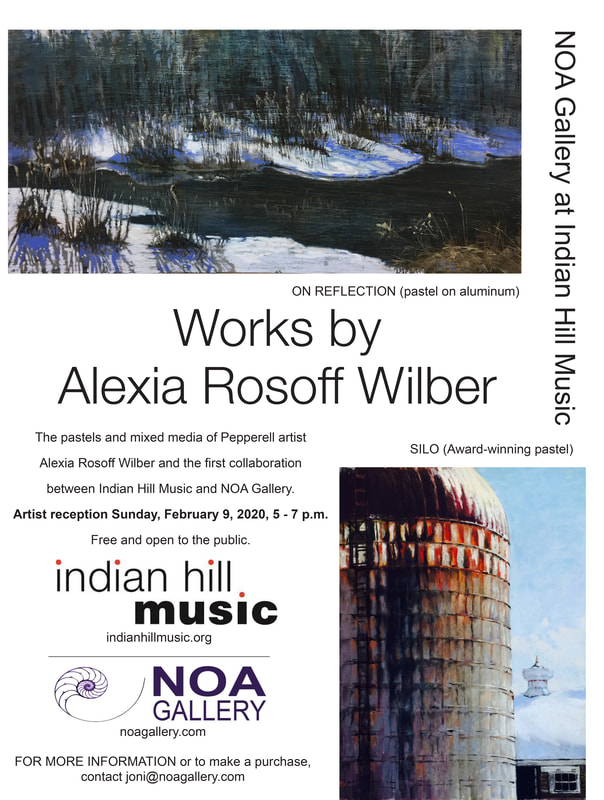 I am delighted to participate in the beginning of a new collaboration between NOA Gallery of Groton, MA and Indian Hill Music in Littleton, MA. Eight of my paintings are hanging in Indian Hill Music's Camilla Blackman Hall, soaking in the harmonies and reverberations of their talented musicians! I've always appreciated musical performance; after six years of piano lessons in childhood I decided I was better at the easel than the piano, but my mother and grandmother played duets together for 60 years! My memories are full of laughter and music, from classical to show tunes to Boogie-Woogie. I am so happy that my first solo show of art is taking place in a venue so full of music! The show will run now through February 29, 2020. There will be a reception on Sunday, February 9 from 5 to 7 pm, just after a concert of baroque music of oboe and bassoon by Catherine Weinfield-Zell and Hazy Malcomson. I hope my paintings and their music will sparkle and sing together! Tickets for the concert are $15; the reception afterward is free and open to the public. https://indianhillmusic.org/performances/chamber-music-at-indian-hill/catherine-weinfield-zell-hazy-malcolmson/ NOA Gallery will be curating the art hanging at Indian Hill Music. For information or to inquire about a painting, please contact Joni Parker-Roach at [email protected] . You can find information about performances at Indian Hill Music at indianhillmusic.org. Definitely check out their new construction under way in Groton...they are building an astounding new campus for music performance and instruction!  An affordable alternative to a tabletop printing press: a cold mount laminator! One of the limitations to printmaking in a home studio is the high cost of a printing press. There are quite a few options for printing by hand, from Japanese style barens to rolling pins to spoons! Those all work well in certain situations, and for acetone transfers they’re essential, a press just won’t work. But for many monotypes and collagraphs, a press can really speed up the process...if you can afford one! About a year ago I came across a device called a cold mount laminator (there are electric hot laminators too), designed to adhere photographic prints or other artwork to backing boards of various types. I wanted to try it for adhering sanded pastel paper to foam core before starting a painting, since it’s really tricky to mount a finished pastel to a backing board during framing, without being able to touch the surface or flip the painting over. I found a company in Washington State called Pacific Mount, which specializes in this kind of mounting and sells all the products you need: adhesives, boards of all sizes, and laminating machines. When I saw their 25” laminator, it struck me that it was extremely similar in form to a printing press for etching or intaglio: two opposing drums with a crank that rolls your plate and paper between them. It has two knobs to adjust the pressure, and enough space for a flat bed to support the work, plus some cushioning material. The company was great about answering my questions (“Um, no, we haven’t heard of anyone using it this way, but give it a try!”), and the laminator is very affordable—especially compared to a “real” press which can run thousands of dollars. So I was excited to give it a spin. And it worked! Really well!  Pacific Mount's 25" cold mount laminator. The body of the laminator is metal, so it’s fairly heavy. The bed folds up for storage or transport, and I use a very small bungee to hold it closed when not in use. The drums are rubber, and while the pressure knobs are plastic, the rest of the threaded pressure adjustment is metal, and the whole thing feels robust. Monotype doesn’t require the same level of pressure that intaglio does, since you’re not trying to push dampened paper into incised areas of the plate. All the texture that you create is on the surface of the plate, and can only be printed once or maybe twice (the ghost print) before the ink is used up. So I’ve found the pressure of the rubber drums to be quite adequate. I’ve fastened the laminator down to a piece of birch-faced plywood, which can in turn be clamped onto my work table so it doesn’t slide during a print. And I do think that a larger diameter crank handle would be easier to use, and allow me to crank with one hand while guiding my paper through the bed with the other, so I’m looking for a way to modify or replace the handle. A “real” press has a heavy metal bed that rolls back and forth between the drums to support a plate and paper, and several specialized felt blankets to cushion the work and spread the pressure evenly. I’ve had good results using a piece of 3/16” foam core as a bed, and I’ve also used a sheet of plexiglas and masonite—all are fine. The traditional combination of blankets is a thin sizing catcher next to the paper, a thick cushion blanket, and a thin pusher blanket on top. These blankets can add up to a thickness of 3/4 inch, which is the largest space that the laminator can have between the drums. So I’ve left out the thick cushion blanket, and use only two blankets: the catcher is a very thin pressed all-wool felt that I purchased from a specialty printmaking supply shop, and the pusher blanket is a thicker wool felt that I got at a local fabric store. (I’ll link to all the materials at the end of this article.) The important quality of the blankets is that they’re natural wool, which withstands the repeated pressure better than synthetic felt, and that the blanket that’s closest to the paper does not have a weave that could transfer texture to the paper under pressure. Back in school, I was always taught that the blankets are not washable, and any student who got ink on them would be drawn and quartered and then have to buy replacement blankets and a round of drinks for the entire art department. Now I suspect that if you got water miscible ink, like Akua, on the blankets, they could in fact be gently washed and laid flat to dry. But it’s a good idea to put a few sheets of newsprint under your plate and on top of your paper as you run it through the press, just to catch any stray ink and spare your blankets.  The sizing catcher is the thin white blanket, while the natural wool colored blanket is the cushion/pusher. There are a few things that are good to remember. First, if you’re new to printmaking, remember that the image on your plate will be reversed horizontally on your paper. That hardly matters unless you have text in your image! Second, protect the drums on your press—in this case, they’re rubber and could be damaged. If you’re trying collagraph and adding texture that stands up above the surface of your plate, for example putting an inked leaf or vine on the plate, I recommend reinforcing the blankets with a piece of foam core laid on top. The foam can deform on one side while staying smooth on the other, sparing any indentation on the upper rubber drum. Third, wipe everything down, including your hands, before you lay your paper on the plate and put your work on the press. Stray ink on the borders of your image is just disappointing. Printmaking is a very malleable process, that rewards you for experimentation and for thinking through your process before you start. Peeling the paper away from the plate is like opening presents on Christmas...anticipation, some trepidation, sometimes glee and sometimes disappointment. When it works, the texture of a print is totally unique to the medium. Some parts of the monotype process are uncontrollable, which is actually great if you’re looking for a way to loosen up your work! Prints can be run through the press multiple times with different colors, disparate methods can be combined for a single print, and prints can be overpainted with watercolor, acrylic, pastel, ink or many other mediums. If you haven’t tried it yet, I hope you’ll give it a shot! I’m by no means an expert printmaker, but if you have questions please leave them below, and I’ll try my best to answer. Pacific Mount: www.pacificmount.com/products/laminators-and-accessories They have 25” and 39” laminators! Etching blankets: www.takachpress.com/access/blankets 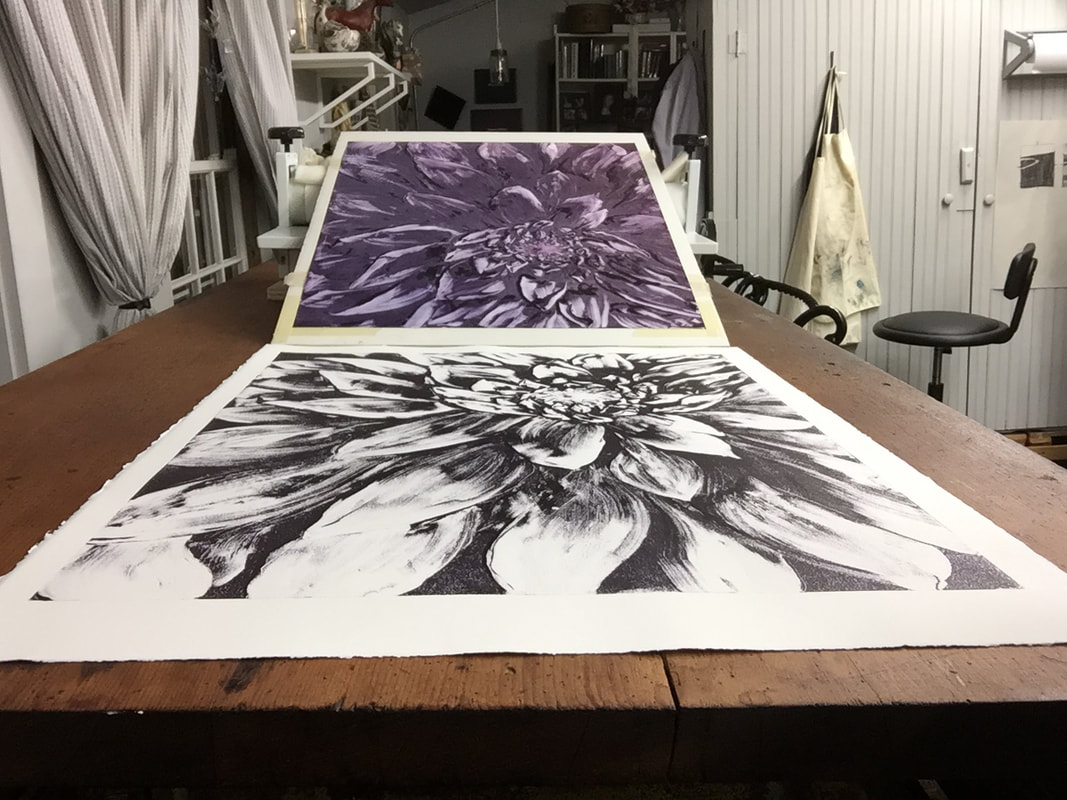 "Dahlia", monotype on Rives BFK, hot off the press! Post update: I’ve gotten many questions about how the laminator performs with various kinds of plates. I’ve tried monotypes on plexiglas, metal and Yupo paper; engravings on plexiglas and metal, collagraph plates made from mat board, found objects and TetraPak cutouts, mounted and unmounted linoleum blocks. The laminator has pulled great prints from all of them! I don’t generally make large editions, so I can’t speak to wear and tear on the drums after hundreds of prints—but I’ve had mine in frequent use for about three years now, and it’s going strong. I highly recommend trying it if you’re looking for an alternative to a hand baren! (The only process I prefer to do by hand at this point is mokuhanga. Getting the delicate patterns of wood grain to transfer with transparent ink is best done with a Japanese bamboo baren.) 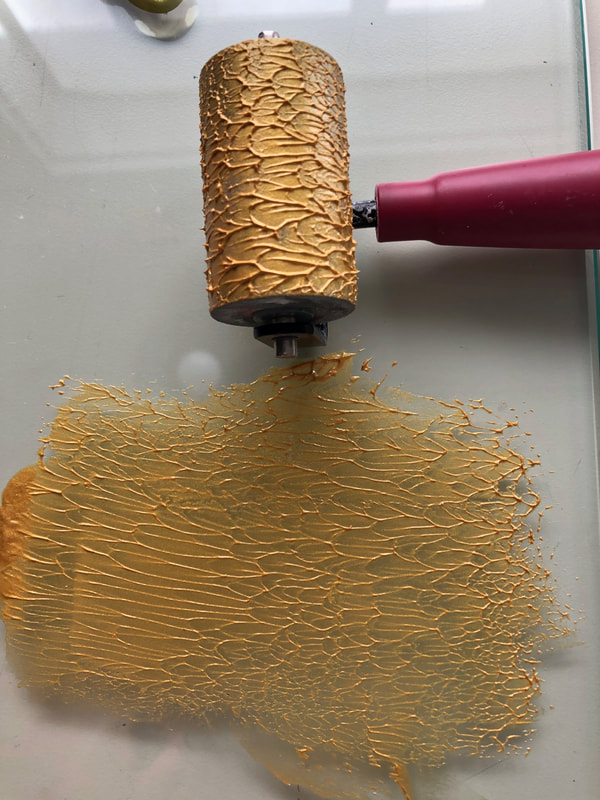 Lately it seems that I've been taking the quick and easy way to share what I've been up to, via Instagram. That's great, but then I realized that my own blog was feeling left out of the fun. So I'll try to be better about posting here where things can be archived! I've been playing around with monotype printmaking quite a bit lately. I took intaglio printmaking in college, and because of that I'm able to identify different types of prints when I see them in museums--but without an etching press and all the trappings of a proper print studio at home, intaglio is not really very accessible. Monotype and collograph, on the other hand, are more flexible for the home studio and don't require a printing press capable of a lot of pressure (and even small tabletop printing presses are rather expensive). They can be printed by hand with a baren, print frog, rolling pin, or even a spoon! I'll share images of some great products that I've found to make printing easier, and affordable. Last fall I was lucky enough to take a workshop with Dawn Emerson, whose book Pastel Innovations is a wonderful resource and inspiration for using pastels in new and exciting ways. (Click on the title to go to the book's entry on Amazon.) I highly recommend it!! Usually, in a workshop, you don't do much good work. You're too busy learning and trying things, stretching, struggling and not having time to finish anything. You might get a few pieces done, and maybe one you're not planning to toss in the trash when you get home. But at Dawn's workshop, the room was full to bursting with great work! It was fast, loose, a little messy, expressive, creative and fun! We all went home ready to roll up our sleeves and make messes in our own studios...aaaand then the holidays hit, the cold set in, there were precious few hours of daylight to do anything at all, and we just wanted to sleep. Well, I did anyway. But now that I'm crawling out from under my winter blanket, I've pulled out the messy creative stuff again. :-) 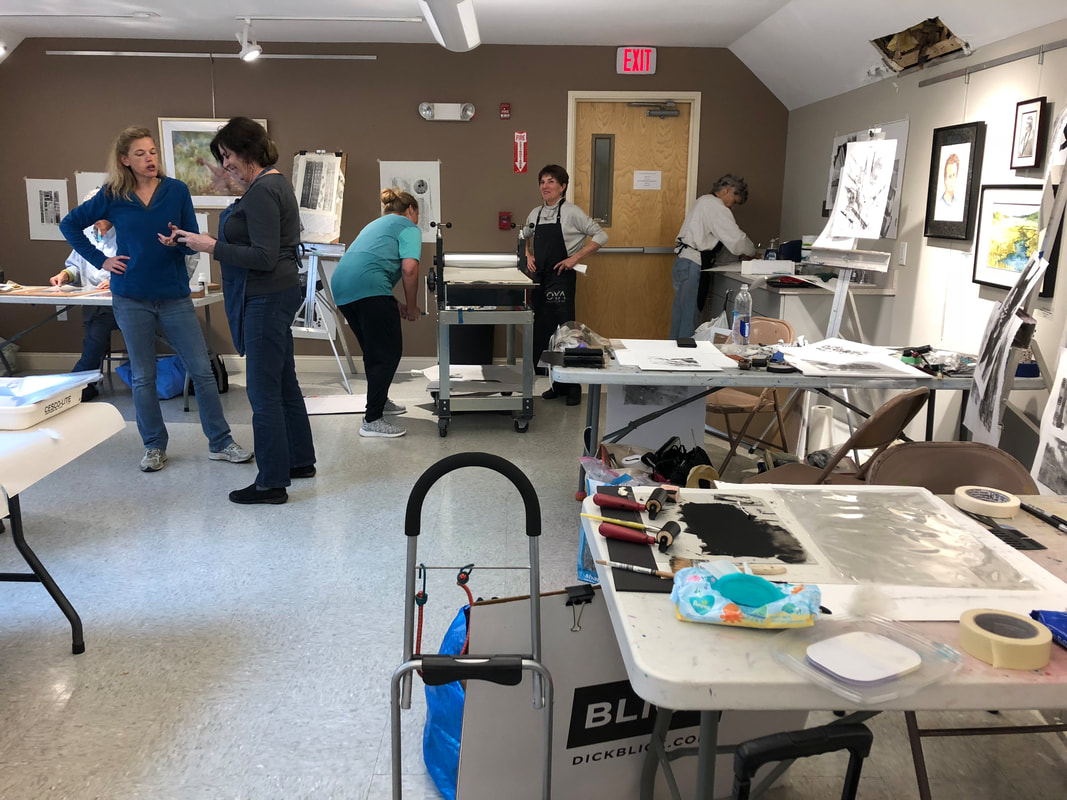 Dawn (in the black apron) surveying the creative mess at the Falmouth Art Center, October 2018. :-) 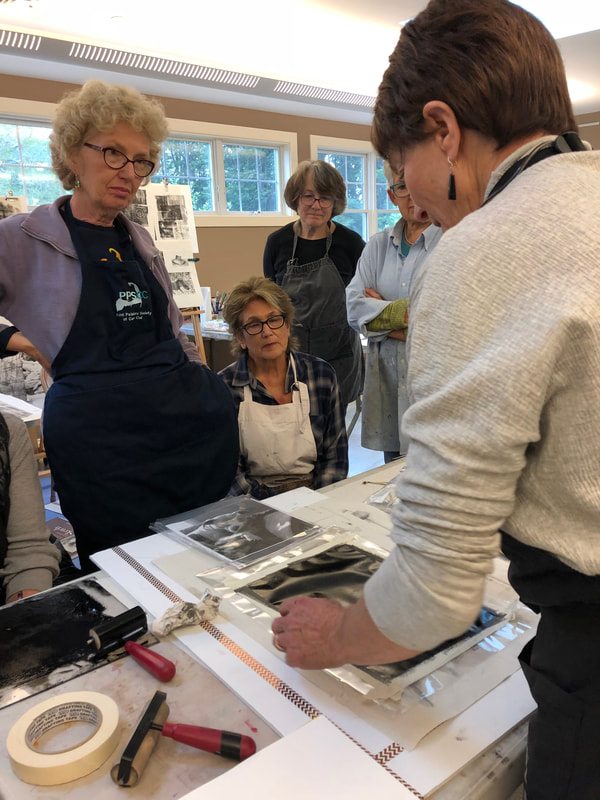 Dawn is demonstrating a monotype process, and how she adds pastel over the print later. 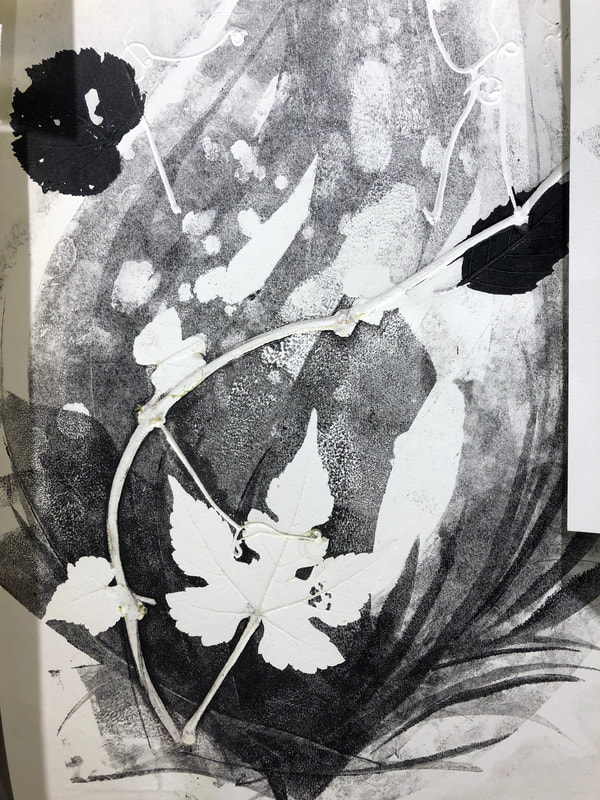 Here's one of the prints I did in the workshop, which is technically a collograph because I put a leaf and a vine on the plate, adding dimension above the surface. This created an embossed image in the paper as well as the inked image. 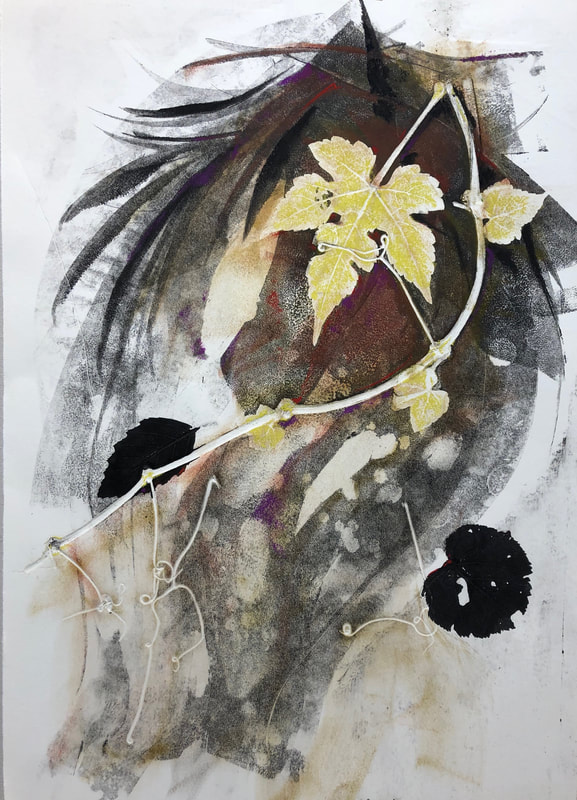 Here's the finished print with pastel added. Super fun stuff, no? While I do believe in the value of drawing, planning a painting, thumbnails and notans, etc., it's so freeing to occasionally just mess around and see what happens! Monotype printmaking is a great way to get an image to start with, whether you keep working in ink or add pastel, paint, wax, or whatever else on top. I'm kind of on a roll with this stuff, so I'll post more as soon as I can!
 The Miss Laura Louise is framed, packed and ready to travel to Cape Cod! Framing always takes me longer than I think it will; this year I have a Logan point driver, which is so much easier and faster than pushing points with a hand tool. Still, with a new baby, it's hard to find the stretch of time needed to work with glass and sharp things in the studio! The munchkin comes with me to the studio on some days, when I'm painting or working on the computer. I use non toxic spike lavender and walnut oils when oil painting, and I have an air filter near the easel when I paint with pastels, but some days are just not good for babies in the studio.
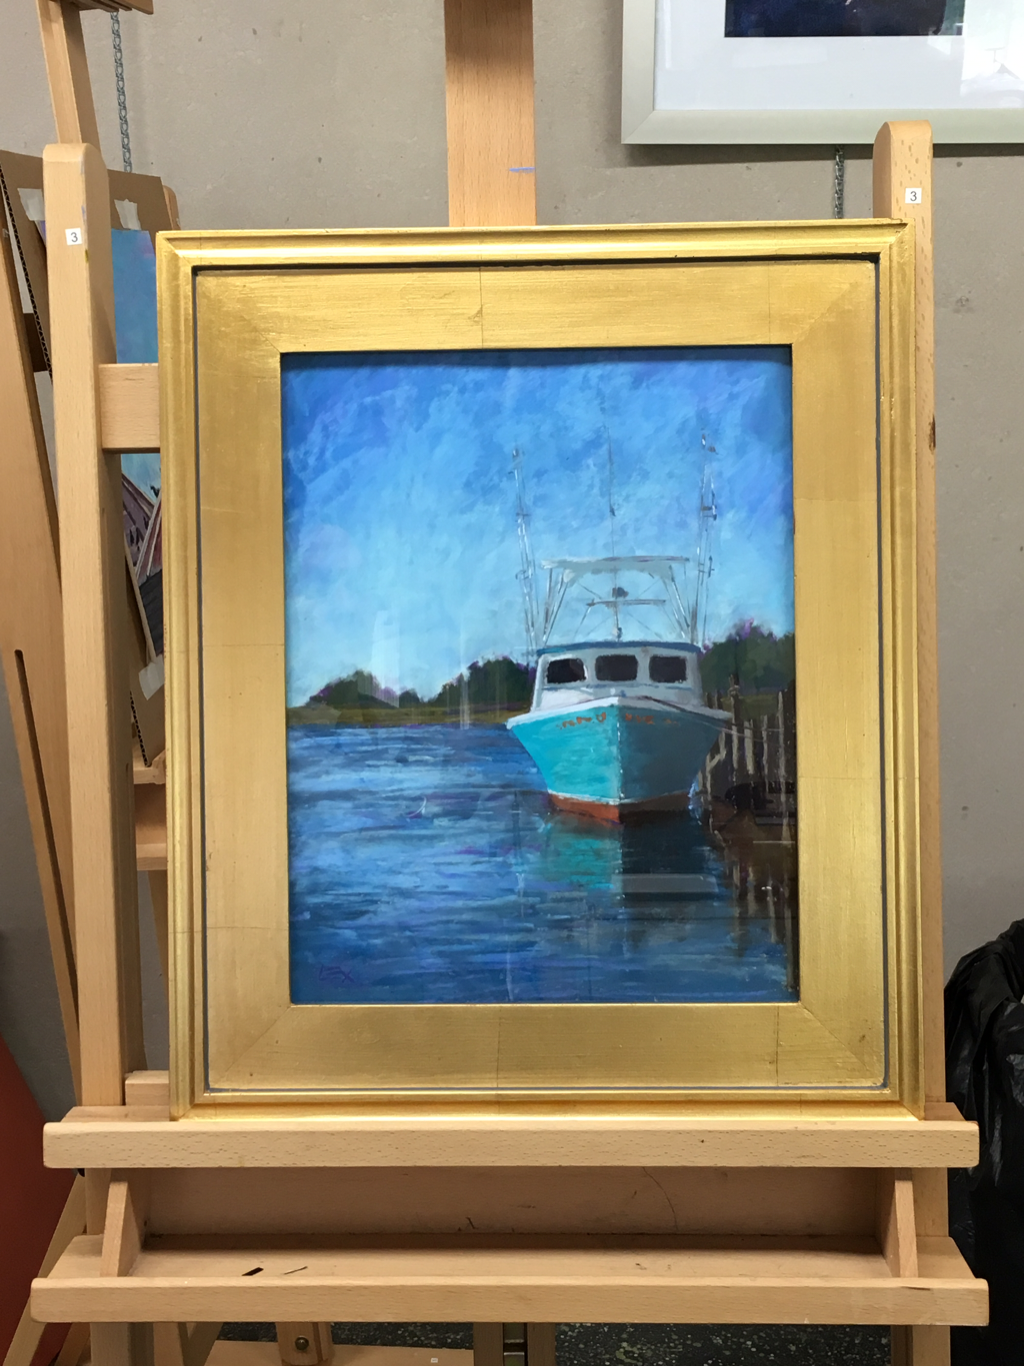
Anyway, fellow FPO artist Christine Chisholm has kindly offered to ferry my painting to Cape Cod next weekend, since I'll be away at my (20th!) college reunion. Thanks, Chris! For Pastels Only on Cape Cod opens June 14, with a reception June 18. For more info, check out the website of the Pastel Painters Society of Cape Cod. http://www.pastelpainterssocietyofcapecod.com/  I'm delighted to have my pastel painting, The Miss Laura Louise, juried into this year's For Pastels Only show, run by the Pastel Painters Society of Cape Cod! The show will run June 14 to July 10 at the Cultural Center of Cape Cod in South Yarmouth, Massachusetts. This is a great show every year, at a terrific venue, organized by incredibly friendly and supportive artists. Thanks so much to Juror Tom Christopher for the honor of including my work!
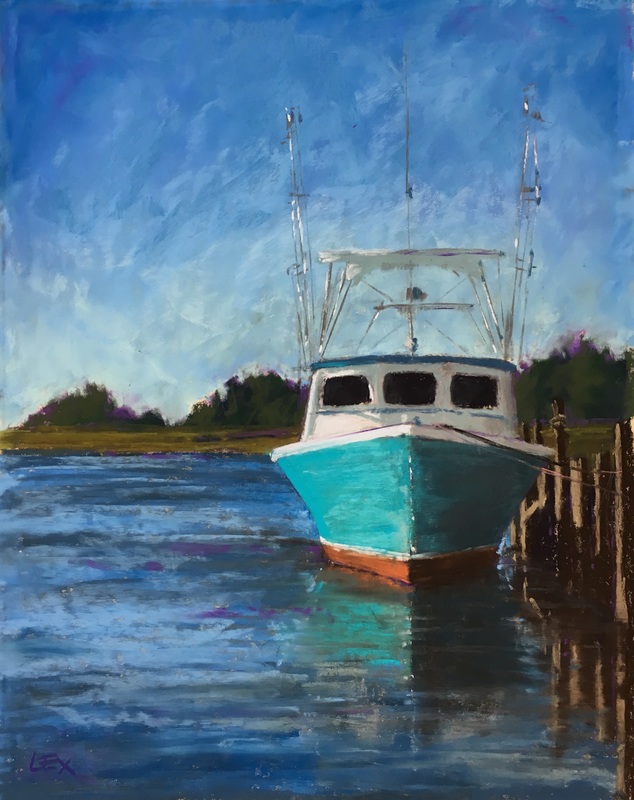 I grew up around boats, and the water, in New Jersey and Maine. Sailboats, motor boats, dinghys, kayaks, sunfish, all of that. Oddly, I haven't painted them much. Dunno why. I've also spent 26+ years working with horses, and I haven't painted them much either. Time to work on both subjects! So anyway, here's an attempt at a lovely boat I saw in Delaware last fall--a fishing boat with a glorious hull color! I think I have a few more touch ups to do on this painting, but I have to be careful not to overdo it. The more details I add, the more precise I try to get, the more accurate I have to be...and big chunky pastels are not great at small fussy details!
|
Alexia Rosoff Wilber
News and notes about art. Archives
July 2020
Categories
All
|


 RSS Feed
